
It can be difficult to set up a website, especially if you are a beginner or not very tech-savvy. You’re not the only one. We have helped many people create websites with WordPress and decided to put together the best step-by-step guide on how to build a professional website.
This guide on how to make a professional website is suitable for users of all ages and skill levels.
Here is an overview from start to finish of all the steps we’ll walk you through in this guide.
- How to find and register a domain name for free
- Choosing the best web hosting
- How to install WordPress
- Installing a template to change your site’s design
- Creating pages in WordPress
- Customizing WordPress with add-ons and extensions
- Resources to learn WordPress and get support
- Taking it further, building websites with more features
- Proven ways to make money from your website
Before we start, let’s cover some of the most commonly asked questions that we get.
What do I need to build a professional website?
You’ll need the following three things to start your WordPress site.
- A domain name – this is the name of your website such as google.com
- WordPress hosting – this is where your website files are stored.
- 45 minutes of your undivided attention.
How much does a WordPress website cost?
A business website costs as little as $100 annually and as much as $30,000 annually.
We recommend all our users start small and then increase the number of features as their business grows. This will help you save money, minimize losses, and avoid spending too much.
This guide will show you how to build a professional website for less than $100.
We’ll also show you how we can make it even more powerful by adding new features in the future.
Which is the best website platform?
Many website builders are available to help you create a professional website. For your professional website platform, we recommend self-hosted WordPress.
WordPress is the most used website platform in the entire world. WordPress powers almost 28% of all websites.
WordPress is completely free and includes thousands of extensions and designs. It’s extremely flexible and can be used with nearly every third-party service and tool that is available to website owners.
WordPress is used to build most of our websites, including this netpreneursblog.com.
How to make the most out of this tutorial?
This tutorial will show you how to create a professional website. It has been divided into steps and we will walk you through each step. Follow the steps and you will have a professional-looking website.
Based on your requirements, we will help you find the best direction to take your site to the next level.
Have fun creating your website.
Ready? Let’s get started.
Step 1. Setup
The biggest mistake that beginners make when creating a website is selecting the wrong platform. You are here so that you don’t make this mistake.
It makes more sense for 95% of users to use WordPress.org, also known as self-hosted WordPress. Why? It is completely free and you can use plugins to customize your site, make money off your site, and more.
You’ve probably heard WordPress is free.
It might seem odd that it is free. You might be wondering what the catch is.
There is no catch. It is free because you have to do the setup and host it yourself.
You will need a domain and web hosting.
Domain names are what people type in to reach your website. It is your website’s URL on the Internet. Google.com and netpreneursblog.com are examples.
Your website is hosted on web hosting. Web hosting is your website’s home on the internet. Every website requires web hosting.
Domain names typically cost $14.99/year, while web hosting is usually $7.99/month.
This is a lot for those who are just starting.
Thankfully, Bluehost, an official WordPress recommended hosting provider, has agreed to offer our users a free domain name and over 60% off on web hosting.
→ Click here to Claim this Exclusive Bluehost offer ←
Bluehost was founded in 1996, which is before Google. It’s one of the oldest web hosts. Because they host millions of websites, including ours, they are the most well-known brand in WordPress hosting.
Bluehost is a WordPress partner since 2005.
Many people make the error of purchasing hosting from unreliable companies. They regret it later. This step-by-step guide will show you how to purchase reliable web hosting and domain names.
This tutorial will use Bluehost as my hosting service.
Bluehost offers a Free SSL Certificate which is essential if you collect customer details or accept credit card payments on your website.
NOTE: We believe in transparency at netpreneursblog.com We will earn a small commission if you sign up for Bluehost through our referral link. In fact, you’ll save money and get your domain free of charge. While we would still receive this commission if any other WordPress hosting company was recommended by us, we recommend Bluehost as we believe that this service will be of value to our readers.
Let’s go ahead and purchase your domain + hosting.
Follow this guide to purchase your domain name and hosting plan. Take a sip of coffee and read this guide carefully.
Here are some things to do before we start:
1. Domain Name
Your domain name is your online address. This is the place where your website lives.
Bluehost will give you one domain name for free. You can also use any domain names you already own.
To find the right domain name for your business, you can use a free service such as BustAName.
2. Payment Mode
You can pay for your domain and web hosting using a credit card, debit card, or PayPal. Make sure you have your preferred payment method handy.
Let’s now buy our hosting plan…
The step-by-step guide to buying a web hosting plan:
To begin, head over to the Bluehost homepage and click on “get started now”.

This will take you to a page where you will see three different packages from which to choose.
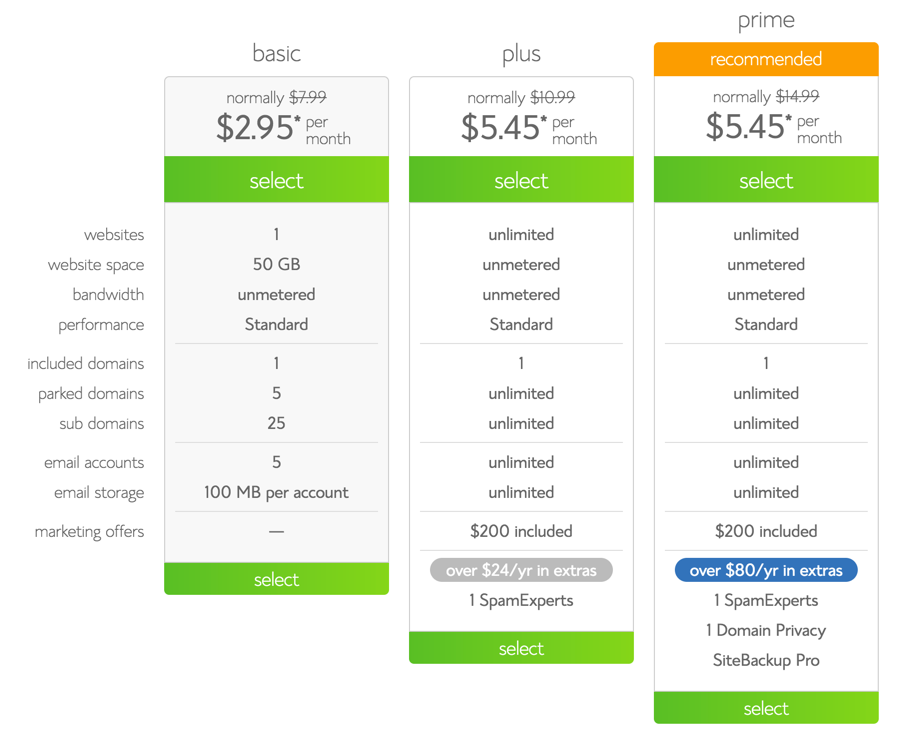 Here are my recommendations:
- Running only one site: Basic
- Running more than one site: Plus
- Need SSL and dedicated I.P. address: Prime
Click on “select” in front of the plan you have chosen.
Note: In this tutorial, I’m buying the Starter plan for 12 months. The process is the same regardless of which plan you choose.
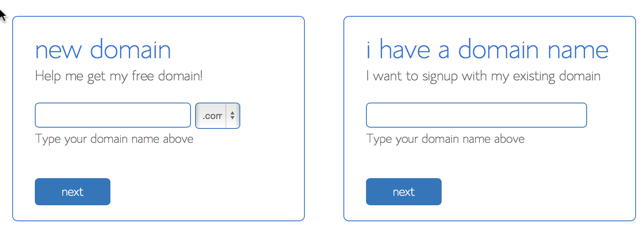
Step 1: Choose a new (free) domain, or use an existing domain.
After selecting your plan, you can either choose to get a free domain name from Bluehost, or you can use any of your existing domain names.
 Remember that you can use your free domain name later if you don’t need it now.
You can also claim your free domain at a later point. Just email Bluehost’s customer service team and they’ll help you out.
If you are using an existing domain name, you need to change the nameservers at your domain registrar to:
- NS1.Bluehost.com
- NS2.Bluehost.com
If you want to keep things simple, enter the domain name you wish to buy in the “new domain” field, and your free domain will be activated with the web hosting plan.
Click on “next”, and from here, the remaining steps will be very simple.
Step 2: Enter your account details.
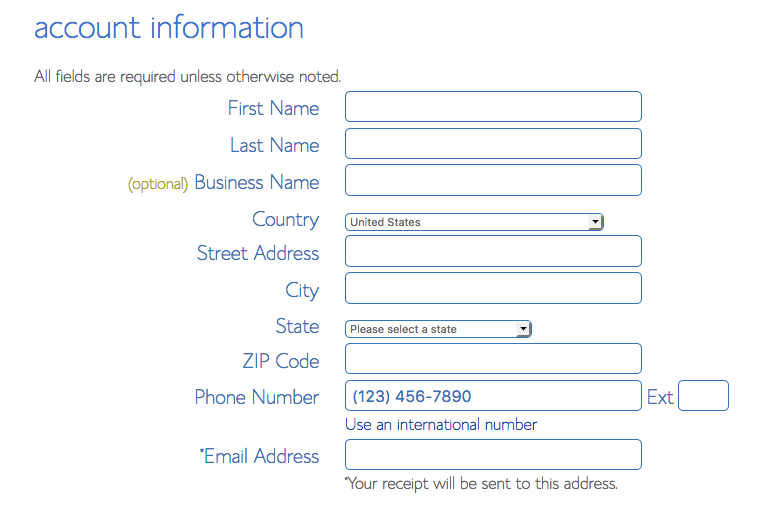 In this section, you need to enter your details (name, email address, address, etc.).
Make sure you verify every detail, especially your email address. Your login and hosting information will be sent to your email address.
Step 3: Select the right package.
This part is crucial, and you should pay extra attention here to make sure that you are not overcharged for add-ons that you do not need.
Choose your hosting package for a 12, 24, or 36-month term. You will notice that the price decreases as the tenure increases.
 Be sure to deselect the options “Site Backup Pro” and “Sitelock Security” as you don’t really need them.
Step 4: Complete your hosting purchase.

Before you make your payment, I suggest that you scroll up and verify all of the information once again.
By default, you will see the option to make payment via credit card only, but if you want to make payment via PayPal, click on “more payment options” and it will reveal the pay by PayPal option as well.
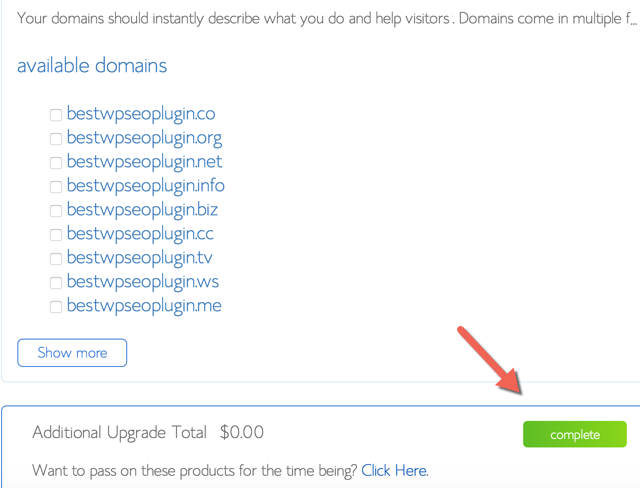
After making the payment, you will see another sales page like the one below.
Ignore this.
Click on “complete” at the end of the page.
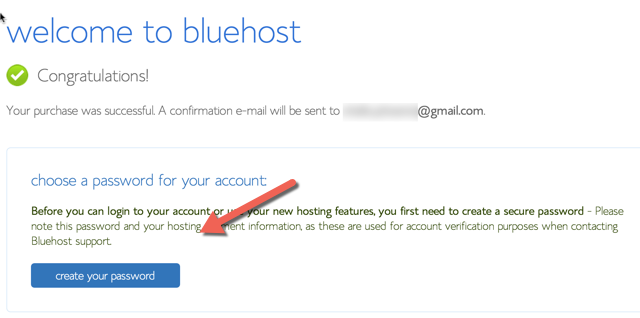
 On the next page, you will see a confirmation of your hosting package purchase, and you will see a screen like the one below.
Click on “create your password”.
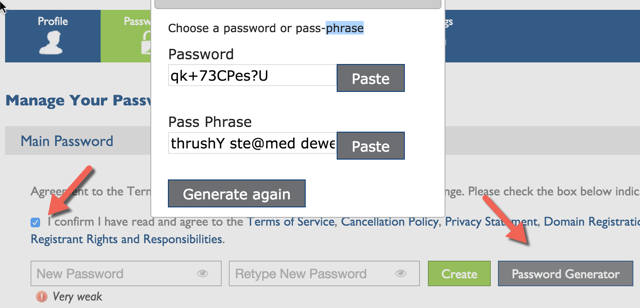
 Step 5: Select a password.
This is the final stage of your web hosting purchase.
You can choose a password, or you can use a password generator to create a complex password (which I recommend). Copy and paste the password in a safe place, and click on “Paste”.
Click on “Create”, and that’s it!
 Now the process of buying web hosting for your website is 98% complete.
Step 6: Log into your web hosting cPanel.
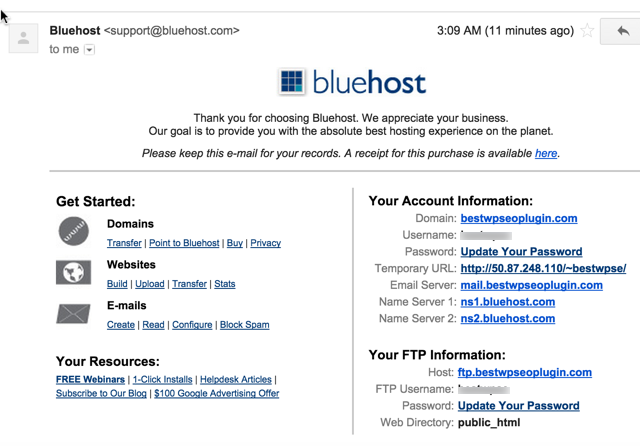
Check your email inbox, and you will find a confirmation email with all of the login information for your web hosting account. The only thing that will not be included in the email is the password you created in the last step — this is for your security.
 Go to Bluehost.com, and click on “log in” at the top.
In the login field, type your domain name or username and the password which you have chosen or generated.
Click “submit”.
 You will now be inside of your Bluehost cPanel.
 That’s it! Congratulations! You have just purchased your web hosting package and domain name.
Step 2. Install WordPress
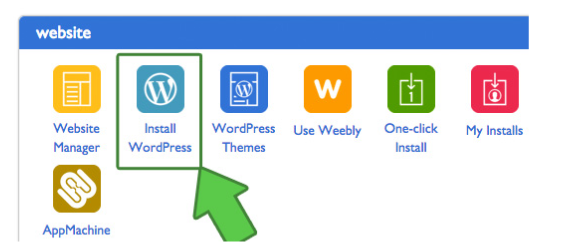
In the cPanel, you will see dozens of small icons for different services and features. This can be a bit overwhelming, so ignore 95% of them because you will never need to use them.
Scroll down to the website section and click on the WordPress icon.
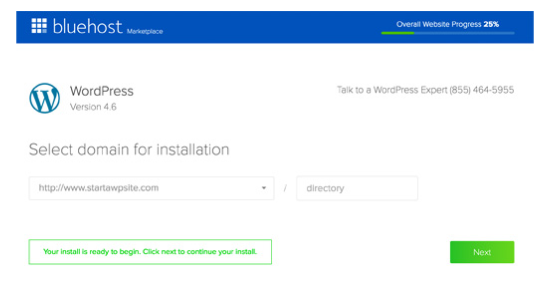
You will be redirected to the Bluehost Marketplace Quick Install screen for WordPress. Click on the Get Started button.
On the next screen, you will be asked to select your domain name. Choose the domain from the dropdown and then click Next.
After that, you need to enter your Site Name, username, and password for your site. You also need to check all the checkboxes and then click Install.
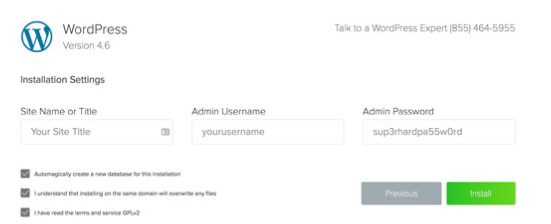
The QuickInstall will start installing WordPress. The marketplace will prompt you to browse WordPress themes, while WordPress is being installed.
No need to do that right now. We’ll show you how to get free WordPress themes in the next step.
Once WordPress is finished installing, you will see the success notice in the top header bar.

Click on the Installation Complete link, and it will take you to the screen with your WordPress login URL and password.

Congratulations, you have created your WordPress site. That wasn’t too bad right.
Your WordPress login URL will look like this:
Click on the WordPress login link to log in to your dashboard.
Now we’re ready to customize your site’s appearance.
Step 3. Selecting your WordPress Theme
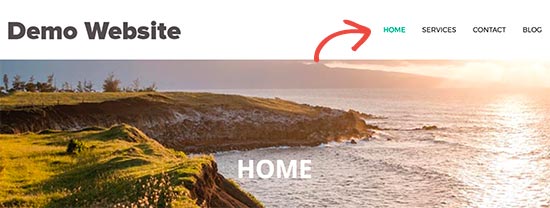
The visual appearance of your WordPress website is controlled by themes. When you first visit your blog, it will look something like this:
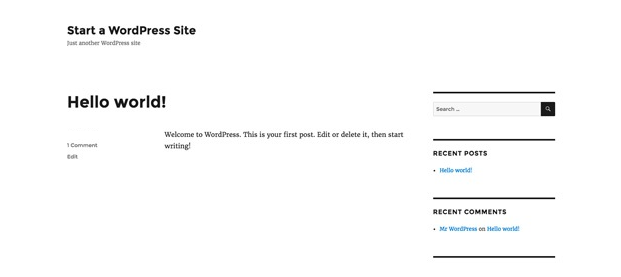
This is not very appealing to most people.
Customizing the look and feel of your website is by far one of the most exciting and rewarding parts of the journey of creating your WordPress site.
There are thousands of pre-made WordPress themes that you can install on your site. Some of them are free, while others are paid.
You can change your theme by going to your WordPress dashboard and clicking on Appearance » Themes.

Go ahead and click on the Add New button.
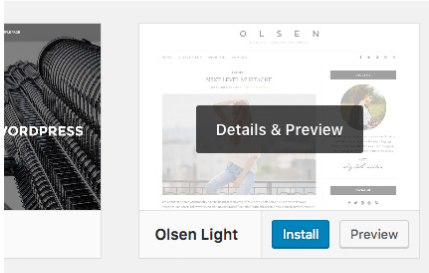
On the next screen, you will be able to search from the 4100 free WordPress themes that are available in the official WordPress.org themes directory. You can sort by popular, latest, featured, as well as other feature filters (i.e industry, layout, etc).

When you have found the theme that you like, simply bring your mouse on it, and it will show the Install button. Click on it and wait for the theme to be installed. After that, the install button will be replaced with an Activate button. You need to click on it to Activate the theme.
Once you have installed your theme, you can customize it by clicking on the Customize link under the Appearance menu.
For the sake of this guide, we’ll be using Bento. It is a popular multi-purpose free WordPress theme with flexible design options for all kinds of websites. If you want a premium theme, you can get that on themeforest.net
If you know the name of the free theme you want to install, then you can look for it by entering its name in the search field.
WordPress will show you the theme in search results. You will need to take your mouse over to the theme and then click on the Install button.

Once you have installed Bento, you can customize it by clicking on the Customize link under the Appearance menu.
This will launch the theme customizer where you will be able to change your theme settings with the live preview of your website.
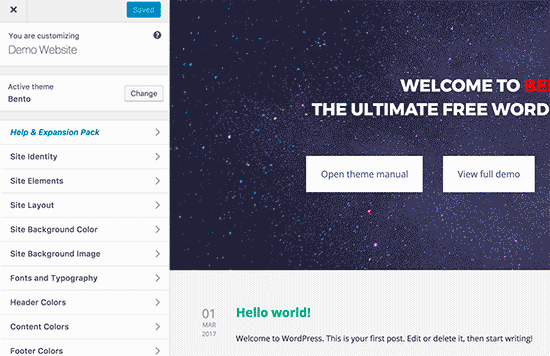
You don’t have to finalize all theme settings right away. You will be able to customize it much better once you have some content on your website.
Let’s see how to add content to your WordPress site.
Step 4. Add Content to Your Site
WordPress comes with two default content types called posts and pages. Posts are part of a blog and appear in reverse-chronological order (newer items displayed first).
On the other hand, pages are meant to be static “one-off” type content such as your about page, contact page, privacy policy, etc.
By default, WordPress shows your blog posts on the front page of your website. You can change that, and make WordPress show any page as the front page of your website (we’ll show you how to do that later in this guide).
You can create a separate page for your blog or news section. In fact, you can create a professional website without any blog section at all.
Having said that, let’s add some content to your website.
You’ll start by adding a few pages to your WordPress site. Don’t worry if you don’t have enough content for these pages at the moment. You can always edit and update them later.
Head over to Pages » Add New page in the WordPress admin area. This will bring you to the page editor screen, which looks like this:
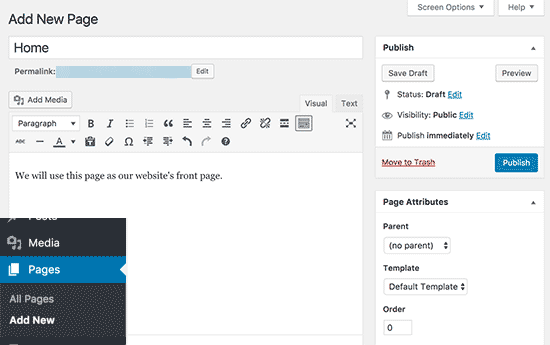
First, you need to provide a title for your page, let’s call this page ‘Home’.
After that, you can add content in the text editor below. You can add text, links, images, embed videos, audio, etc.
After adding content to your page, you can click on the publish button to make it live on your professional website.
You can repeat the process by adding more pages for different sections of your website. For example, an about page, contact us, and a blog page to display blog posts.
Now let’s add a few blog posts as well.
Head over to Posts » Add New in your WordPress admin area.

You will see a screen much like you saw earlier when adding pages.
You can add a post title and then add content in the visual post editor. You’ll also notice some extra options like post formats, categories, and tags.
You can click on the save button to store your post as a draft or click on the publish button to make it visible on your site.
Step 5. Customizing and Tweaking Your Website
Now that you have created some content on your website, you will be able to customize and put it all in a nice presentable shape on your professional website.
Let’s start by setting up a static front Page.
Setting up a Static Front Page
You need to visit the Settings » Reading page in your WordPress admin area. Under the ‘Front page displays’ option click on the static front page and then select ‘Pages’ you created earlier for your home and blog pages.
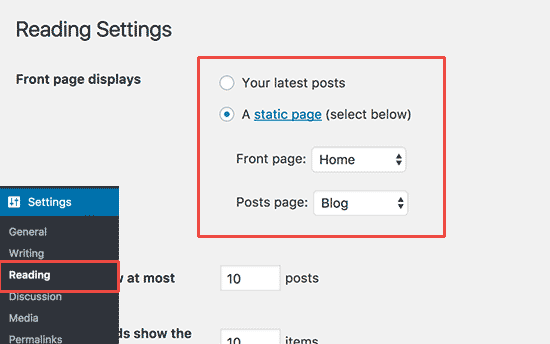
Don’t forget to click on the ‘Save Changes’ button at the bottom of the page to store your changes.
WordPress will now use the page titled ‘Home’ as your site’s front page and ‘Blog’ page to display your blog posts.
Change Site Title and Tagline
During the installation, you get to choose your site’s title. WordPress automatically adds a tag line to your site title that says ‘Just another WordPress site’.
You can change both your site’s title and tagline at any time by visiting Settings » General page.

Your site title will be the name of your professional website like NetPreneursBlog. The tag line is usually a single line that describes your website. You can also leave the tag line field blank if you want.
Don’t forget to click on the save changes button to store your settings.
Set up Comments Settings
WordPress comes with a built-in comment system allowing your users to leave comments on your posts. This is great for user engagement, but it is targeted by spammers as well.
To deal with this, you’ll need to enable comment moderation on your professional website.
Visit Settings » Discussions page and scroll down to ‘Before a comment appears’ section. Check the box next to ‘Comment must be manually approved’ option.
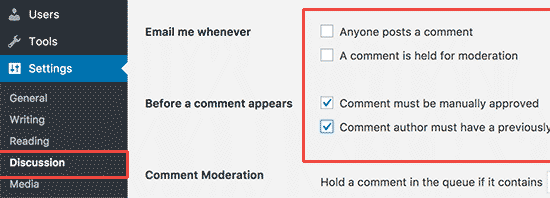
Don’t forget to click on the save changes button to store your settings.
Create Navigation Menus
Navigation menus allow your users to browse different pages or sections on your professional website. WordPress comes with a powerful navigation menu system, and your WordPress theme utilizes this system to display menus.
Let’s add a navigation menu to your website.
First, you need to visit Appearance » Menus page. Enter a name for your navigation menu and click on the create menu button.
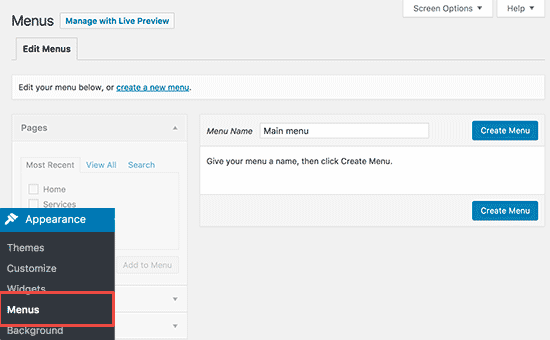
WordPress will now create your navigation menu. But it will be empty at the moment.
Next, you need to select the pages you want to display in your menu and then click on add to menu button.
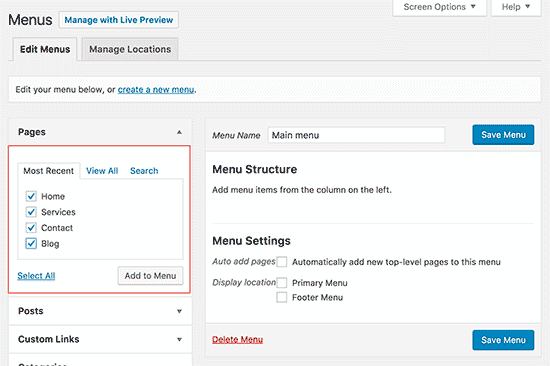
You will notice your selected pages filling the empty area of your navigation menu. You can move them up and down to rearrange their position in the menu.

Now you need to select a display location. These locations are defined by your WordPress theme. Usually, most WordPress themes have a primary menu that appears on top.
Finally, click on the save menu button to store your navigation menu.
You can now visit your website to see the menu in action.
Step 6. Installing Plugins
WordPress Plugins are like apps for your WordPress site. They allow you to add features to your WordPress site. Think contact form, photo galleries, etc.
There are currently more than 49,000 free plugins available for WordPress. There are also paid plugins sold by third-party websites and developers.
With this many plugins, how do you find which plugins to install? We got you covered there as well.
Here is our list of essential plugins that you should install on your site right away. All of them are free.
Features
- WPForms Lite – This allows you to add a contact form to your WordPress site.
- Envira Gallery Lite – Add beautiful image galleries to your WordPress site
- Soliloquy Lite – Display beautiful image sliders on your website
Website Optimization
- Yoast SEO – Improve your WordPress SEO and get more traffic from Google
- WP Super Cache – Improves your website speed by serving cached pages
Security
- Updraft Plus – Create automatic scheduled backups of your website
- Sucuri – Website security audit and malware scanner
That’s all for now.
We hope this guide helped you learn how to make a website without hiring a developer or overspending money.
If you liked this article, feel to share it with others.
If You Are Interested In Starting A Home-Based Business In Nigeria, Click here to get started
Copy Our System And Pocket $200 Daily Without Sweat. You Too Can Make Money With Affiliate Marketing. Click here to know how
How To Start Recharge Card Printing Business And Gain Passive Income. Click here to get started
How To Create And Sell Your First Information Product. Discover How To Make Millions Monthly From Information Marketing Business. Click here
Do You Need A Profitable Business Idea You Can Start With As Low As N20,000? Click here to get started

I need a great job
Please i am capable
Opay longin
It very good